Corotherm Polycarbonate Roofing Sheet Installation Guide
1. Preparation
For a lean to installation you will need the following materials:
- Corotherm Polycarbonate Sheet
- Corotherm Glazing Bar
- Corotherm Side Flashing
- Corotherm End Caps
- Corotherm Super Fixing Buttons
- Corotherm Breather Tape
- Corotherm Aluminium Sealing Tape
- Flashing Tape
- Wood Screws
- Silicone Lubricant Spray
- Low Modulas Neutral Cure Silicone Sealant
Begin the project by installing the flashing tape to provide a waterrtight seal between the wall and roof.
.jpg) 2. Glazing Bar Preparation
2. Glazing Bar Preparation
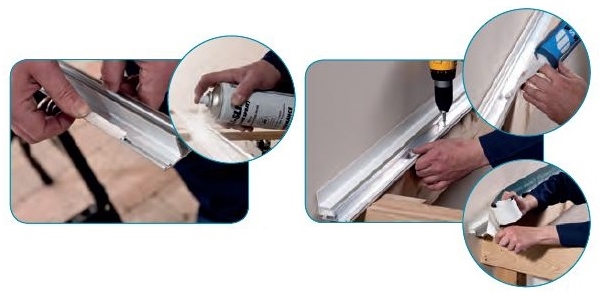
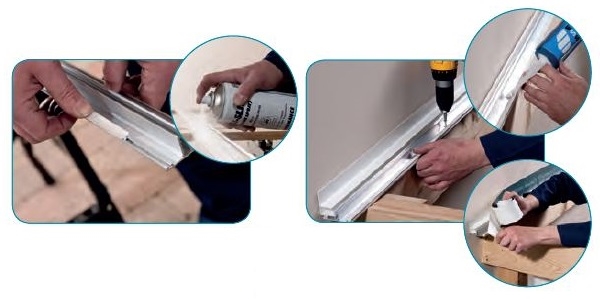
Glazing bars are installed on each of the rafters. Before installing the glazing bars, you will first need to insert the seals either side of the bar base. The use of silicone lubricant can make the installation of the seals easier.
Install the seals and avoid stretching.
Installing on Rafters
You will need to pre-drill the glazing bar in preparation for fixing to the rafters - at approximately 400mm centers staggered on alternate sides.
 Installing on Purlins
Screw the bottom half of the glazing bar to every purlin. Ensure the purlin spacing is not greater than 1500mm.
Screws shoud be sealed in waterproof silicone sealant, wiping off any surplus after driving the screws.
Use the 'F profile' upside down so that it forms an up stand which can be sealed to the wall with flashing tape.
3. Sheet Preparation
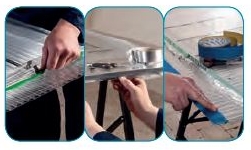
If you need to size the polycarbonate sheets to suit the structure, Corotherm can be easily cut to size and will not crack or shatter.
When cutting parallel to the flutes a sharp knife can be used but when cutting accross the flutes a fine toothed saw is required. For cutting curves use a fine-toothed jigsaw.
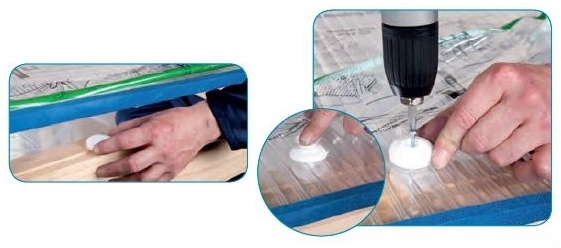
Set the correctly sized sheet into position allowing a sufficient expansion gap at the top end of the sheet and mark a hole centrally at the lower end of the sheet for a fixed button. This fixing will prevent the sheet from moving once installed.
Remove the sheet to the bench to drill where you have marked. Remember all Corotherm sheets must have an expansion allowance of 3mm arround all fixings.
Any swarf from cutting or drilling should be removed by vacuuming.
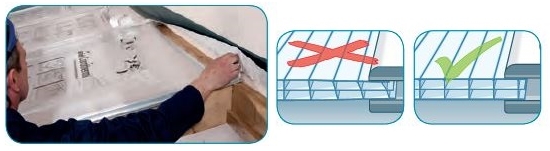
Next peel back the protective film from all edges of the Corotherm sheet on both sides.
Fix the sealing tape at the top end of each piece of Corotherm and the perforated breather tape at the bottom making sure tapes are not creased or torn.
 4. Installation of the Sheet
With the silver sealing tape at the top of the slope and the breather tape at the bottom, push the sheet into position between the glazing bars. Ensure that the printed film is facing upwards. At least one vertical rib of each Corotherm sheet should engage with the glazing bar at each side, again leaving a 3mm expansion gap.
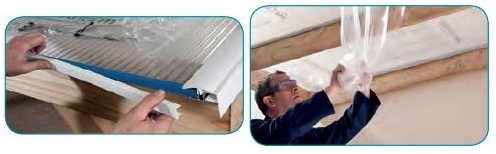
Flashing tape forms a completely watertight seal at the top of the sheet.
With the sheet now in the correct position, secure into place using the Corotherm Fixing Button in the pre-drilled hole.
Starting at the downslope end, line up the ends of the cap and base and tap home with a rubber mallet until the edge seals have flattened against the sheet.
Over driving the glazing bar cap may cause damage to sheets over time as they expand and contract with temperature changes.
Continue laying sheets and glazing bar caps in this way.
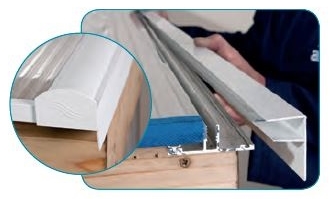
5. Fitting the F-Profile
Finish the edge of the roof with an F-profile which can be secured to the rafter or barge board with screws.
Fit the final glazing bar cap and complete the run of flashing.
6. Fitting End Caps U-Profiles
To protect the breather tape, fit end caps or U-Profiles to the end of the sheet.
The U-Profile should be cut into sections to fit between rafters. Run a bead of sealant along the top edge of the end cap to prevent water penetration. Fit U-Profile into place with the drip detail leading into the gutter. Wipe off any excess sealant.
Once the U-Profiles are in place. fit the glazing bar end caps.
Finally, remove all protective film.
.png) Corotherm Polycarbonate Roofing Sheets Installation Guide
Corotherm Polycarbonate Roofing Sheets Installation Guide