Contact Us
Item Code:

25mm Clear Multiwall Polycarbonate Sheet 700mm Wide

£49.46
( Incl VAT £59.35)
Corotherm 25mm Clear Fivewall Polycarbonate (700mm Wide) Roofing and Cladding Sheets are Available in Lengths of 2m, 2.5m, 3m, 4m and 6m - 3 sheets (mixed) is the minimum order requirement for polycarbonate
Est. Delivery 5 - 7 Working Days
Order in the next Hours Mins and Seconds,
To get your item delivered on Friday

25mm Clear Multiwall Polycarbonate Sheet 700mm Wide

Corotherm Polycarbonate Fivewall Sheets are strong, lightweight and come with a manufacturers 10 Year Warranty - The Cost Effective Solution for Glazing and Panelling.
The Corotherm Polycarbonate System is ideal wherever heat insulation, reduced condensation, or simply a more attractive glazing material is required.
Opal, Bronze, Bronze Opal and Heatguard Opal Options are also available.

Applications:
Conservatories
Car Ports
Extensions
Porches
Swimming Pool Covers
 
Availability: In stock - 3 sheets (mixed) is the minimum order requirement for polycarbonate
Estimated Delivery: 5 working days
Manufacturer: Ariel Plastics
Product Code: 2070255CH (2m) - 2570255CH (2.5m) - 3070255CH (3m) - 4070255CH (4m) - 6070255CH (6m)

►Return to product list

Delivery Information


Delivery Charges

We offer a free standard delivery service on all orders over £500.00*. Orders under £500.00* will be charged a delivery fee. All delivery charges are calculated at basket and are dependent on the items ordered.

Our standard delivery area covers mainland England, Scotland (Excluding Highlands) and Wales. For all other areas around the UK an additional delivery charge will need to be applied, we will advise you of this charge before your order is dispatched. For deliveries to these areas we are happy to provide a free quotation upon request.

Free Delivery Exclusions

  • All Tapco Products
  • Roof Vents are not available for delivery to Ireland and Northern Ireland.

Mardome Rooflights

It is important to note that all Mardome rooflight orders are subject to a failed delivery charge in the event of unsuccessful delivery. This fee is £85 ex VAT and must be taken into account when making your purchase.

If you wish to return your order, please contact us. However, it is important to note that due to many Mardome rooflights being made to order, returns are only accepted in exceptional circumstances and a collection charge of £85 ex VAT will be applied if approved. We recommend taking the time to review your order carefully before making payment as this fee is non-refundable.

Should you have any queries regarding Mardome rooflights, please don't hesitate to contact us. Our team are dedicated to providing excellent customer service and will be more than happy to answer any questions you may have.


Delivery Dates and Times

We will always do our best to deliver stocked items ordered via our website within 3-5 working days. This applies to goods ordered before 12.00pm and in stock.

Please see estimated delivery times (Est. Delivery) on each product.


Roof Tile Vents

All the Roof Tile Vents and Cowls are made to order (due to thousands of combinations of different variants available) bespoke items which are non-returnable.


Other Information

Some of our products, because of their size (5m and over) and weight (over 80 kilos), have an estimated 5 to 7 working day lead time but we will endeavour to get them to you as soon as possible.

Maximum number of roof sheets available on one delivery is 40, otherwise a forklift is required please call for more information.

The Mardome Hi-Lights Range of Dome Rooflights have a 48 hour delivery schedule. Orders must be received by 1pm to qualify for the 48 hour (2 working days) delivery. Only available to mainland GB (excluding postcode areas begining KW, IV, AB, and PH).

We regret that timed deliveries cannot be given. Deliveries will be made between 8.00am and 5.30pm Monday to Friday.


Made to Order Item's (Bespoke Items)

Please note all made to order items are made are non-returnable.

Signing For Your Delivery

All deliveries should be signed for and we would politely request that you sign and clearly print your name so that in the unlikely event that there are any discrepancies we will have a person to contact. If a signature cannot be obtained we will try to leave the goods in a safe location, but we cannot be held responsible for shortages or damages where goods have not been signed for.

Accepting Your Goods

Large or palletised goods will be delivered to a hard standing area only. The Customer shall be solely responsible for the unloading of the Goods and the Seller shall not be liable for any damage that occurs in the course of such unloading.

Any shortages or damages must be reported within 48 hours.

Delivery Vehicle

If goods aren't sent by our own vehicles they are sent by reputable carriers such as Tufnell's, Fed-Ex and Parcel Force. Heavier goods may be delivered by larger vehicles and will be off loaded as close as possible to the property whilst remaining on a hard standing surface.

Good Advice

Please do not arrange any labour until your materials are on site as we are unable to compensate you for your time in the event of a late delivery.

If you have ANY questions about our products, or want to give us some feedback about your shopping experience with us, please feel free to contact us on 03302 230 267 or email: [email protected]

*excluding VAT

Corotherm Polycarbonate Roofing Sheet Installation Guide

1. Preparation
For a lean to installation you will need the following materials:
  • Corotherm Polycarbonate Sheet
  • Corotherm Glazing Bar
  • Corotherm Side Flashing
  • Corotherm End Caps
  • Corotherm Super Fixing Buttons
  • Corotherm Breather Tape
  • Corotherm Aluminium Sealing Tape
  • Flashing Tape
  • Wood Screws
  • Silicone Lubricant Spray
  • Low Modulas Neutral Cure Silicone Sealant
Begin the project by installing the flashing tape to provide a waterrtight seal between the wall and roof.


2. Glazing Bar Preparation
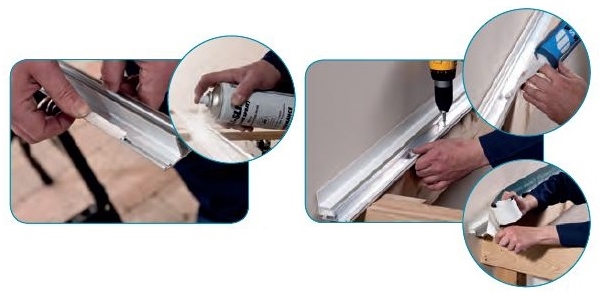
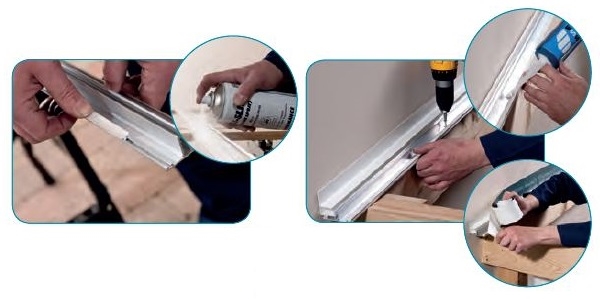
Glazing bars are installed on each of the rafters. Before installing the glazing bars, you will first need to insert the seals either side of the bar base. The use of silicone lubricant can make the installation of the seals easier.
Install the seals and avoid stretching.
Installing on Rafters
You will need to pre-drill the glazing bar in preparation for fixing to the rafters - at approximately 400mm centers staggered on alternate sides.
Installing on Purlins
Screw the bottom half of the glazing bar to every purlin. Ensure the purlin spacing is not greater than 1500mm.
Screws shoud be sealed in waterproof silicone sealant, wiping off any surplus after driving the screws.
Use the 'F profile' upside down so that it forms an up stand which can be sealed to the wall with flashing tape.

3. Sheet Preparation
If you need to size the polycarbonate sheets to suit the structure, Corotherm can be easily cut to size and will not crack or shatter.
When cutting parallel to the flutes a sharp knife can be used but when cutting accross the flutes a fine toothed saw is required. For cutting curves use a fine-toothed jigsaw.
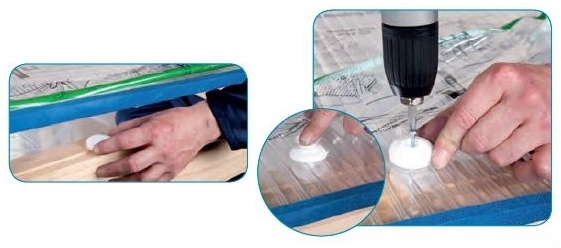
Set the correctly sized sheet into position allowing a sufficient expansion gap at the top end of the sheet and mark a hole centrally at the lower end of the sheet for a fixed button. This fixing will prevent the sheet from moving once installed.
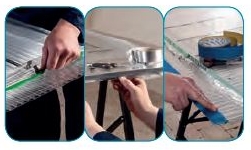
Remove the sheet to the bench to drill where you have marked. Remember all Corotherm sheets must have an expansion allowance of 3mm arround all fixings.
Any swarf from cutting or drilling should be removed by vacuuming.
Next peel back the protective film from all edges of the Corotherm sheet on both sides.
Fix the sealing tape at the top end of each piece of Corotherm and the perforated breather tape at the bottom making sure tapes are not creased or torn.
4. Installation of the Sheet
With the silver sealing tape at the top of the slope and the breather tape at the bottom, push the sheet into position between the glazing bars. Ensure that the printed film is facing upwards. At least one vertical rib of each Corotherm sheet should engage with the glazing bar at each side, again leaving a 3mm expansion gap.
Flashing tape forms a completely watertight seal at the top of the sheet.
With the sheet now in the correct position, secure into place using the Corotherm Fixing Button in the pre-drilled hole.
Starting at the downslope end, line up the ends of the cap and base and tap home with a rubber mallet until the edge seals have flattened against the sheet.

Over driving the glazing bar cap may cause damage to sheets over time as they expand and contract with temperature changes.
Continue laying sheets and glazing bar caps in this way.

5. Fitting the F-Profile
Finish the edge of the roof with an F-profile which can be secured to the rafter or barge board with screws.
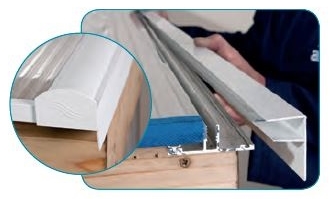
Fit the final glazing bar cap and complete the run of flashing.

6. Fitting End Caps U-Profiles
To protect the breather tape, fit end caps or U-Profiles to the end of the sheet.

The U-Profile should be cut into sections to fit between rafters. Run a bead of sealant along the top edge of the end cap to prevent water penetration. Fit U-Profile into place with the drip detail leading into the gutter. Wipe off any excess sealant.
Once the U-Profiles are in place. fit the glazing bar end caps.
Finally, remove all protective film.
Corotherm Polycarbonate Roofing Sheets Installation Guide

Corotherm Recommended Rafter Centres

25mm Clear Multiwall Polycarbonate Sheet 700mm Wide

Corotherm Polycarbonate Fivewall Sheets are strong, lightweight and come with a manufacturers 10 Year Warranty - The Cost Effective Solution for Glazing and Panelling.
The Corotherm Polycarbonate System is ideal wherever heat insulation, reduced condensation, or simply a more attractive glazing material is required.
Opal, Bronze, Bronze Opal and Heatguard Opal Options are also available.

Applications:
Conservatories
Car Ports
Extensions
Porches
Swimming Pool Covers
 
Availability: In stock - 3 sheets (mixed) is the minimum order requirement for polycarbonate
Estimated Delivery: 5 working days
Manufacturer: Ariel Plastics
Product Code: 2070255CH (2m) - 2570255CH (2.5m) - 3070255CH (3m) - 4070255CH (4m) - 6070255CH (6m)

►Return to product list

Delivery Information


Delivery Charges

We offer a free standard delivery service on all orders over £500.00*. Orders under £500.00* will be charged a delivery fee. All delivery charges are calculated at basket and are dependent on the items ordered.

Our standard delivery area covers mainland England, Scotland (Excluding Highlands) and Wales. For all other areas around the UK an additional delivery charge will need to be applied, we will advise you of this charge before your order is dispatched. For deliveries to these areas we are happy to provide a free quotation upon request.

Free Delivery Exclusions

  • All Tapco Products
  • Roof Vents are not available for delivery to Ireland and Northern Ireland.

Mardome Rooflights

It is important to note that all Mardome rooflight orders are subject to a failed delivery charge in the event of unsuccessful delivery. This fee is £85 ex VAT and must be taken into account when making your purchase.

If you wish to return your order, please contact us. However, it is important to note that due to many Mardome rooflights being made to order, returns are only accepted in exceptional circumstances and a collection charge of £85 ex VAT will be applied if approved. We recommend taking the time to review your order carefully before making payment as this fee is non-refundable.

Should you have any queries regarding Mardome rooflights, please don't hesitate to contact us. Our team are dedicated to providing excellent customer service and will be more than happy to answer any questions you may have.


Delivery Dates and Times

We will always do our best to deliver stocked items ordered via our website within 3-5 working days. This applies to goods ordered before 12.00pm and in stock.

Please see estimated delivery times (Est. Delivery) on each product.


Roof Tile Vents

All the Roof Tile Vents and Cowls are made to order (due to thousands of combinations of different variants available) bespoke items which are non-returnable.


Other Information

Some of our products, because of their size (5m and over) and weight (over 80 kilos), have an estimated 5 to 7 working day lead time but we will endeavour to get them to you as soon as possible.

Maximum number of roof sheets available on one delivery is 40, otherwise a forklift is required please call for more information.

The Mardome Hi-Lights Range of Dome Rooflights have a 48 hour delivery schedule. Orders must be received by 1pm to qualify for the 48 hour (2 working days) delivery. Only available to mainland GB (excluding postcode areas begining KW, IV, AB, and PH).

We regret that timed deliveries cannot be given. Deliveries will be made between 8.00am and 5.30pm Monday to Friday.


Made to Order Item's (Bespoke Items)

Please note all made to order items are made are non-returnable.

Signing For Your Delivery

All deliveries should be signed for and we would politely request that you sign and clearly print your name so that in the unlikely event that there are any discrepancies we will have a person to contact. If a signature cannot be obtained we will try to leave the goods in a safe location, but we cannot be held responsible for shortages or damages where goods have not been signed for.

Accepting Your Goods

Large or palletised goods will be delivered to a hard standing area only. The Customer shall be solely responsible for the unloading of the Goods and the Seller shall not be liable for any damage that occurs in the course of such unloading.

Any shortages or damages must be reported within 48 hours.

Delivery Vehicle

If goods aren't sent by our own vehicles they are sent by reputable carriers such as Tufnell's, Fed-Ex and Parcel Force. Heavier goods may be delivered by larger vehicles and will be off loaded as close as possible to the property whilst remaining on a hard standing surface.

Good Advice

Please do not arrange any labour until your materials are on site as we are unable to compensate you for your time in the event of a late delivery.

If you have ANY questions about our products, or want to give us some feedback about your shopping experience with us, please feel free to contact us on 03302 230 267 or email: [email protected]

*excluding VAT

Corotherm Polycarbonate Roofing Sheet Installation Guide

1. Preparation
For a lean to installation you will need the following materials:
  • Corotherm Polycarbonate Sheet
  • Corotherm Glazing Bar
  • Corotherm Side Flashing
  • Corotherm End Caps
  • Corotherm Super Fixing Buttons
  • Corotherm Breather Tape
  • Corotherm Aluminium Sealing Tape
  • Flashing Tape
  • Wood Screws
  • Silicone Lubricant Spray
  • Low Modulas Neutral Cure Silicone Sealant
Begin the project by installing the flashing tape to provide a waterrtight seal between the wall and roof.


2. Glazing Bar Preparation
Glazing bars are installed on each of the rafters. Before installing the glazing bars, you will first need to insert the seals either side of the bar base. The use of silicone lubricant can make the installation of the seals easier.
Install the seals and avoid stretching.
Installing on Rafters
You will need to pre-drill the glazing bar in preparation for fixing to the rafters - at approximately 400mm centers staggered on alternate sides.

Installing on Purlins
Screw the bottom half of the glazing bar to every purlin. Ensure the purlin spacing is not greater than 1500mm.
Screws shoud be sealed in waterproof silicone sealant, wiping off any surplus after driving the screws.
Use the 'F profile' upside down so that it forms an up stand which can be sealed to the wall with flashing tape.

3. Sheet Preparation
If you need to size the polycarbonate sheets to suit the structure, Corotherm can be easily cut to size and will not crack or shatter.
When cutting parallel to the flutes a sharp knife can be used but when cutting accross the flutes a fine toothed saw is required. For cutting curves use a fine-toothed jigsaw.
Set the correctly sized sheet into position allowing a sufficient expansion gap at the top end of the sheet and mark a hole centrally at the lower end of the sheet for a fixed button. This fixing will prevent the sheet from moving once installed.

Remove the sheet to the bench to drill where you have marked. Remember all Corotherm sheets must have an expansion allowance of 3mm arround all fixings.
Any swarf from cutting or drilling should be removed by vacuuming.
Next peel back the protective film from all edges of the Corotherm sheet on both sides.
Fix the sealing tape at the top end of each piece of Corotherm and the perforated breather tape at the bottom making sure tapes are not creased or torn.

4. Installation of the Sheet
With the silver sealing tape at the top of the slope and the breather tape at the bottom, push the sheet into position between the glazing bars. Ensure that the printed film is facing upwards. At least one vertical rib of each Corotherm sheet should engage with the glazing bar at each side, again leaving a 3mm expansion gap.

Flashing tape forms a completely watertight seal at the top of the sheet.
With the sheet now in the correct position, secure into place using the Corotherm Fixing Button in the pre-drilled hole.
Starting at the downslope end, line up the ends of the cap and base and tap home with a rubber mallet until the edge seals have flattened against the sheet.

Over driving the glazing bar cap may cause damage to sheets over time as they expand and contract with temperature changes.
Continue laying sheets and glazing bar caps in this way.

5. Fitting the F-Profile
Finish the edge of the roof with an F-profile which can be secured to the rafter or barge board with screws.

Fit the final glazing bar cap and complete the run of flashing.

6. Fitting End Caps U-Profiles
To protect the breather tape, fit end caps or U-Profiles to the end of the sheet.

The U-Profile should be cut into sections to fit between rafters. Run a bead of sealant along the top edge of the end cap to prevent water penetration. Fit U-Profile into place with the drip detail leading into the gutter. Wipe off any excess sealant.
Once the U-Profiles are in place. fit the glazing bar end caps.
Finally, remove all protective film.
Corotherm Polycarbonate Roofing Sheets Installation Guide

Corotherm Recommended Rafter Centres

Customer Reviews (0)