Corovent URS Universal Dry Ridge System Installation Guide
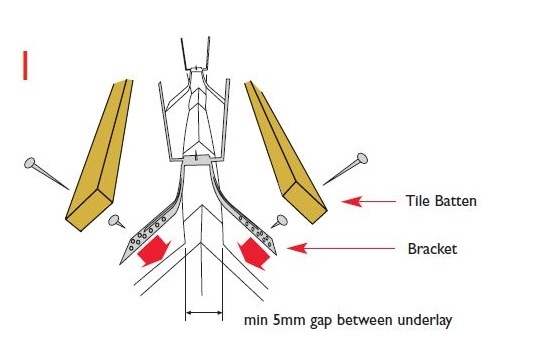
1. Fix one bracket at each rafter. Bend lower legs of bracket to chosen ridge tiles, allowing stainless steel fixing screw (see stage 6) to penetrate ridge batten at a minimum of 20mm.
Correct bending position is best found by temporarily placing top tile batten and a few roof and ridge tiles and eyeing up bracket position beneath ridge tile. Subsequent brackets should be bent identically to the first.
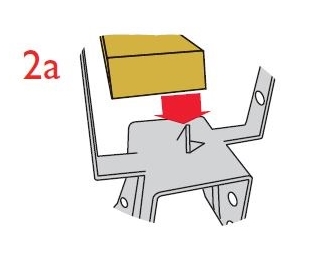
 2a.
2a. Push ridge batten (minimum 25mm x 50mm) firmly onto location spikes.
CAUTION: DO NOT USE A HAMMER - PUSH BATTEN ONLY.
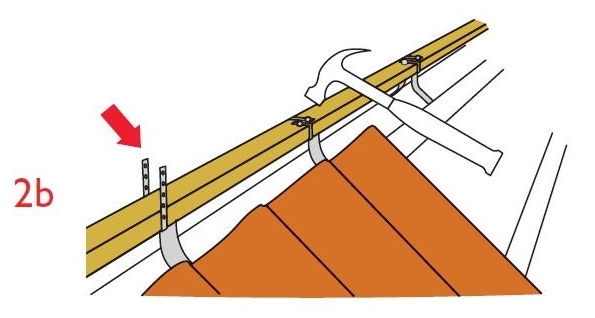
 2b.
2b. When ridge batten is in place, bend bracket upper legs over and fix through holes with nails provided.
CAUTION: TAKE CARE NOT TO FURTHER BEND BRACKET LOWER LEGS WHEN FIXING.
Proceed to lay top row of tiles.
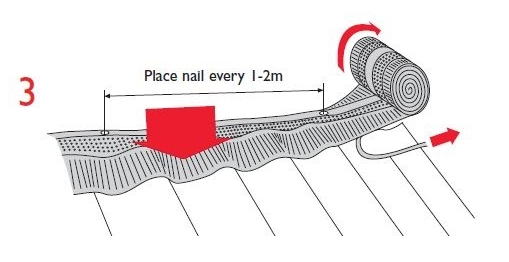
 3.
3. Unroll ridge-roll and fix with a nail at 1-2m centres.
Ridge roll should overlap at edge of gable end by approx. 50mm when using a dry verge or block end ridge tile. When using a bedded verge, stop ridge roll 50mm short from edge of gable end.
Peel backing from mastic strips and press firmly onto tile, checking for good adhesion. Do not attempt fixing if tile is wet or temperature is below 5 degrees C.
If ridge is longer than 6m, overlap rolls by a minimum of 75mm and place a nail in the centre of the lap.
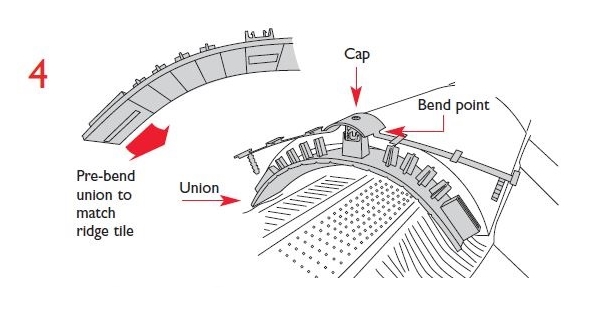
 4.
4. Assemble cap to union and push onto ridge tile.
Cap and union assembly should grip ridge tile without deformation to cap.
Only if needed i.e. triangular ridge tiles, cap arms can be bent at bend point indicated.
CAUTION: BEND ONLY ONCE. REPEATED BENDING CAN OVERSTRESS THE COMPONENT AND LEAD TO PREMATURE FAILURE.
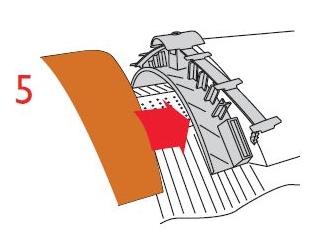
 5.
5. Push next ridge tile firmly into place, trapping it between the cap and the union.
Ridge tiles at end of ridge must be full tiles, do not cut down.
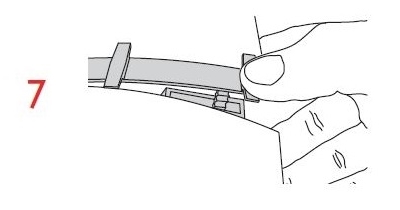
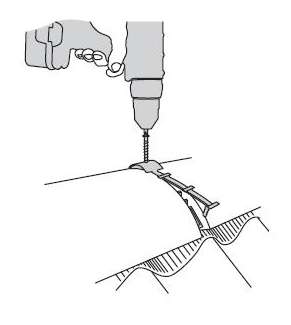
 6.
6. Fix through hole in centre of cap using 75mm stainless steel screws provided.
CAUTION: DO NOT USE NAILS.
Screw should be tightened so that ridge tiles do not lift.
Cap should not deform more than 3mm from its original shape.
NOTE: If at this point it is discovered that the brackets were not set high enough at stage 1. another batten can be screw fixed on top of the original to achieve correct engagement. Ensure additional batten does not block vent holes in ridge roll.
7. Click side arms into place.