Frequently Asked Questions - Roof Tile Vents
At Roofing Ventilation we pride ourselves on being able to provide one of the largest ranges of plastic roof tile vents online. As there is so much to choose from, it can sometimes be difficult to know which one you require.
Roofing Ventilaiton Online provide roof tile vents for clay, concrete and slate tiles that are both currently still in production, or that have been discontinued. So even if the roof tiles are no longer being made we may still be able to provide a tile vent to suit.
What is the difference between a cowl vent and an inline roof tile vent?
Roof Tile Cowl Vent - Also know as a CV10K (Small Cowl) or a (CV20K), the roof tile cowl vent is more visable on the roof line, but offers greater protection against wind driven rain when compared to an in-line vent. A large cowl option offers double the ammount of ventilation, compared to a small cowl vent (Ventilation Area: 10,000mm Sq Small Cowl - 20,000mm Sq Large Cowl). See illustration below of a typical Cowl Vent.

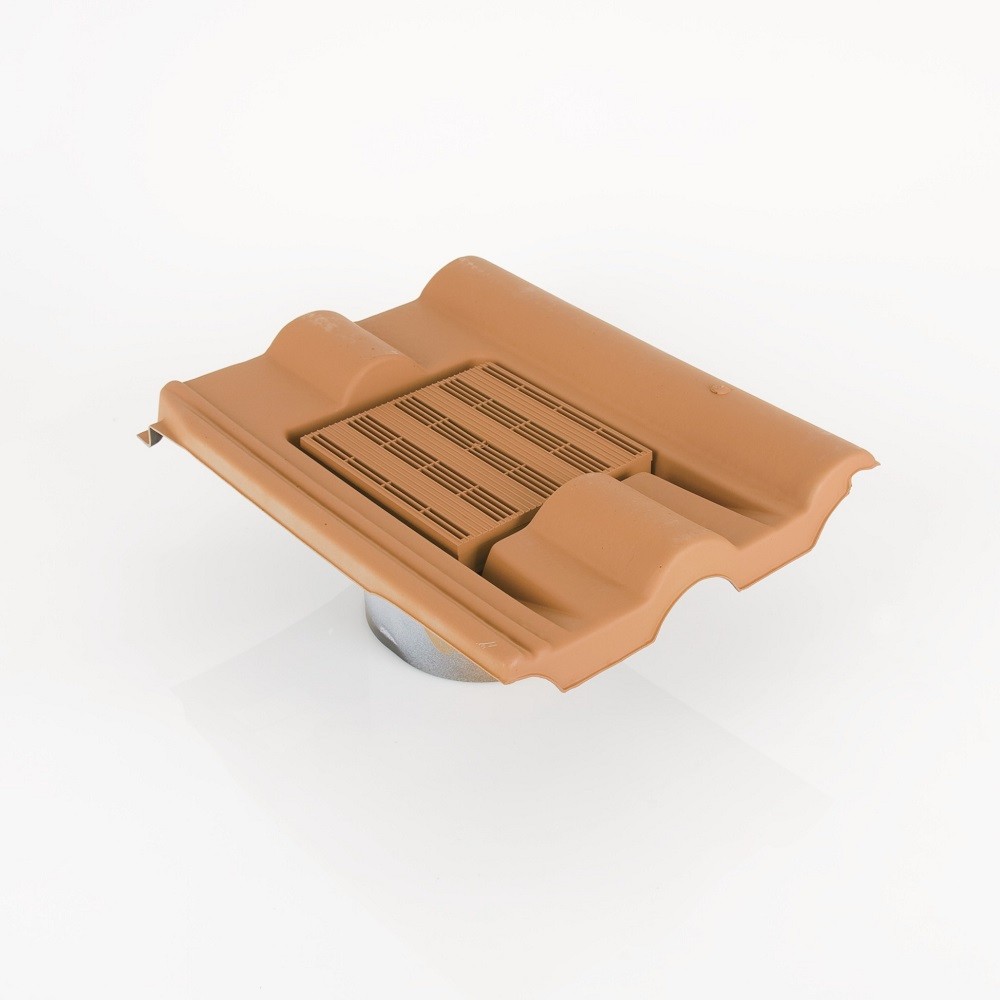
Inline Roof Tile Vent - An inline roof tile vent is less visable on the roof line and has a ventilation area of 10,000mm Sq. See illustration below of a typical inline vent.
What is the difference between a large cowl vent and a small cowl vent?
The difference between a small and large cowl is the ventilation area it covers the small cowl vent has a ventilation area of 10,000mm Sq and the large cowl vent has a ventilation area of 20,000mm Sq.
How do i know what roof tile vent will fit on my roof?
If we can provide a roof tile vent that fits your roof, it will be available on the website by the name of the roof tile it fits, for example if you have Marley (Brand) Wessex (Model) roof tiles, the roof tile vent will be called a Marley Wessex roof tile vent.
If you do not know what roof tiles you have on your roof, not to worry we are more than happy to help you identify them and see if we are able to provide a suitable tile vent.
We are available to contact via live chat, email, phone or click here to take you to the contact us page.
If we do not have a roof tile vent that suits your tiles there may be alternative ways to help ventilate your roof.
How to identify roof tiles
- Remove a tile from your roof.
- Check the back of the tile for any markings i.e. manufacturer name (Redland, Marley, Sandtoft etc).
- Take note of the dimensions of the tile.
- Take note of the profile of the tile.
- Visit the tile manufacturers website for clarification of tile using details above. For example, if it says 'Redland' on the back, go to Redlands website to identify your tile using the dimensions and profile.
Alternatively, if you cannot identify the tile, take some images (front and back) and email or whatsapp them over to us to see if we can help.
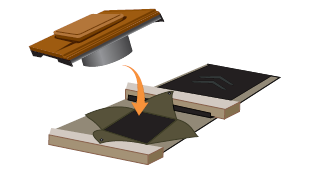
How do i fit a roof tile vent?
Installation in Tile Roof - Cowl or Roofline Vents
- Complete roofing to one course below the position for the tile vent.
- Hold roof vent in position as centrally as possible between the rafters and mark where the roof vent spigot touches the underlay.
- Cut underlay in a cross, fold up and back, nail over battens.
- Fit roof vent, ensuring ‘overlap’ clip locates on underlap of adjacent tile.
- Nail vent to top batten.
- Complete roof in normal manner.
If using COA1 pipe adaptor – clip to felt sleeve and attach CT1C flexitube before fitting into roof.
Click the Installation Guides tab above to see other installation details (Slate, Ridge and Economy Vents).
What is a pipe adaptor and do i need one?
A pipe adaptor is an adaptor that will be sent with your vent if selected, this adaptor allows you to connect a 110/125mm pipe onto the back of the vent, so you can use the roof tile vent to extract air from an extractor fan from your bathroom or kitchen cooker hood.
Can a roof tile vent be used to vent my cooker hood or my bathroom extractor fan?
Yes the ventilation tiles we provide can be used to extract your bathroom or cooker hood, remember to tick the 'Add Pipe Adaptor' box when ordering.
How many ventilation tiles do i need?
Depending on the size of your roof will determine how many vent tiles are required to sufficently ventilate your roof space.
See Roof Tile Vent calculation below.
How to Calculate Number of Roof Vents Required
Where should i place my roof tile vents on my roof?
The manufacturer recommend that the vents are fitted around 400mm away from the ridge and at a minimum the second course of tiles at the eaves.
How do i ventilate my roof properly?
The general rule of thumb when it comes to sufficiently ventilating your roof space is to always install your roof with 2 levels of ventilation.
Low level ventilation - Low level ventilation allows fresh air in to the roof. This can be achieved through soffit vents, over fascia vents, ventilating through the eaves of your roof or roof tile vents positioning them lower down on your roof at a minimum along the second course of tiles at the eaves.
High Level Ventilation - High level ventilation lets the hot stale air out of the roof space allowing the roof to breath and reduce the chance of condensation. High level ventilation can be achieve through ridge tile vent, a dry ridge system of roof tile vents place high up on the roof, 400mm away from the ridge.
If you have any other questions -
We are available to contact via live chat, email, phone or click here to take you to the contact us page.